
Tips & Tricks: How to design your own custom washi tape
Did you know we have a CUSTOM WASHI TAPE SERVICE?
Before designing a Custom Washi Tape for us make sure you read our guidelines and FAQ! 
What you'll need:
- We do recommend having some basic design skills to create a custom washi tape, as we will not be able to print your artwork if it does not meet our printing requirements.
- We recommend using Adobe Photoshop or Adobe Illustrator to create your custom washi tape design.
- You will need to own or have purchased the copyright licensing for your artwork that you would like to use.
Basic Printing Requirements:
- You can print a minimum of 200 washi tape rolls per order, with a minimum of 100 washi tape rolls per design.
- You will need to provide us with .ai, .psd, or a hi-res .pdf file with your final design. We are unable to accept jpeg, png, tiff, or any other file types as they do not meet the requirements for printing washi tape.
Terminology:
Not sure what we're talking about?
Resolution - Is the quality of your image. You can check the quality of your image by finding out what the DPI (dots per inch) number is. We recommend using a design program such as Adobe Photoshop or Adobe Illustrator, so that you can set your DPI and check that your design is 300dpi before sending it to us. A low quality image will be blurry, have pixels (it will not look smooth) and won't print nicely. You can check this when you create a new document in Adobe Photoshop or Adobe Illustrator in the settings under "Resolution" and select 300 "Pixels/Inch".
Colour Profile - CMYK is the colour profile used for printing. You will be able to check this in your washi tape design file.
In Adobe Photoshop under the dropdown menu select "Image" and "Mode" and make sure the mode is set to CMYK.
In Adobe Illustrator you can check this under the dropdown menu "File" and "Colour Mode". Make sure your design document is set to CMYK.
CMYK colours will look different to your regular computer colours because there is a limited colour palette for printing.
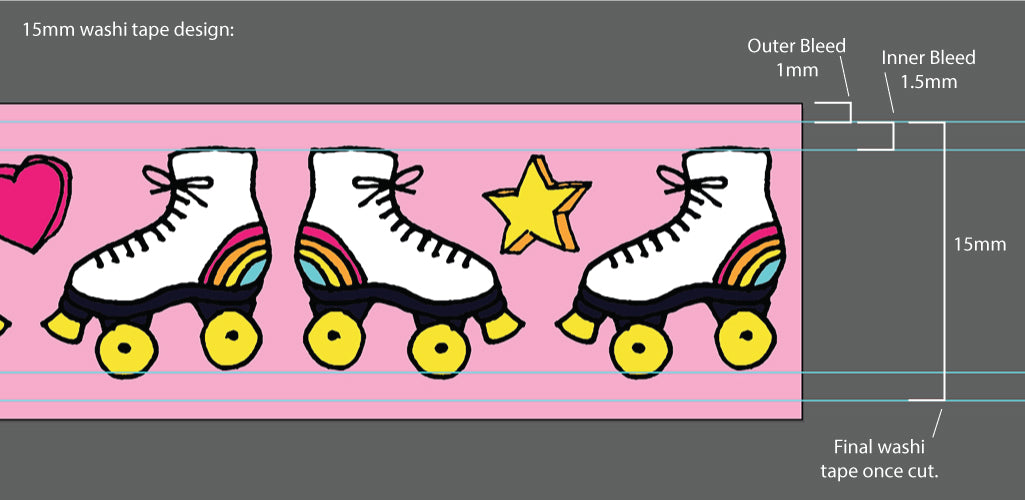
Bleed - Bleed is the name used for the cutting guideline in your artwork/washi tape file. In printing, bleed is printing that goes beyond the edge of where the sheet will be trimmed. In other words, the bleed is the area to be trimmed off. For this reason, you need to add a few extra mm of your artwork on the top and bottom of your washi tape designs (called the bleed). It will not be a part of your finished washi tape when printed, however it helps the printers to cut your artwork so your pattern and colours go right up to the cut line.
How to set up your washi tape template:
Dimensions:
WIDTH: 304.8mm
RESOLUTION: 300dpi
COLOUR PROFILE: CMYK
HEIGHT: You can choose the height of your tape, however you will need to add an extra 1mm at the top and bottom of your design called the bleed (e.g. if you would like to design a 15mm tape, your design will need to be 17mm, keeping in mind that the top and bottom 1mm of your artwork will be cut off by the printer).
eg. A 15mm tape will be 304.8mm x 17mm
A 20mm tape will be 304.8mm x 22mm 
Adding guidelines:
These are guidelines for the printers and yourself to see your design and help them to cut your washi tape in the correct places.
You will need to use 4 guidelines for your washi tape template.
Guideline measurements:
Outer bleed - 1mm from the top and bottom edge of your artwork. (The outer bleed will be cut-off by the printer).
Inner bleed - 2.5mm from the top and bottom edge of your artwork. (The inner bleed is a guideline for where the main part of your artwork should sit to avoid any areas being cut off).
How to turn on your guidelines:
In Adobe Photoshop, create a new layer. Select "View" from the dropdown menu and select "New Guide" - Select Horizontal, Type in the measurement in mm for each of your guidelines, measuring from the top edge of your artwork.
In Adobe Illustrator, to create a guide go to the drop down menu "View" and select "Rulers", "Show Rulers". Next double click on the ruler and a line will appear. Double click on the left hand ruler for a horizontal line, or the top ruler for a vertical line. You can control where that line sits by typing in the millimetres measurement into the X: or Y: input in the Properties and Transform panel on the right hand side. If you can't find the X: or Y: input go to the drop down menu "Windows" and select "Transform" and it should pop up! 
Pattern Repeat Tips:
Does your design repeat?
Your washi tape design will repeat at each end, so you will need to make sure it repeats smoothly. The left hand edge of your design will need to match up perfectly with the right hand edge of your design for it to repeat.
Unless you are a designer and know how to create a blended repeat over a cut line, your design may be mismatched at each end. For example if you have a washi tape design with a cupcake image repeated over and over again, if your cupcake ends half way on the end of the washi tape template, your cupcake will need to be matched in exactly the same place on the other end, or you will have half a cupcake or a mismatched cupcake in your design. Does anyone else feel like a cupcake now? If you're not sure how to match up a repeat, it's often best to have a small space between your design, at each end of the washi tape.
Washi Tape Design Tips:
Tip 1:
Keep it simple. If this is your first washi tape design, keep it simple to start with. There are so many possibilities and trying to do too much in one design can lead to an unclear outcome or a bad result.
Tip 2:
We recommend using Photoshop or Illustrator to create your custom washi tape design. These programs have the capabilities to check things like resolution, colour profile, measurements, bleed guide lines, and file type output which are all required to print your final washi tape designs.
Tip 3:
Think carefully through your design and plan it using our measurements and considering the scale. Remember that washi tape is small!
- Does your design have too much detail to see on such a small scale?
- Will you be able to read text at that size?
- Does your design fit within the bleed/cut lines? If not, parts of your design may be cut off.
Tip 4:
When you are designing your washi tape - make sure your file is in CMYK. This will give you a more accurate picture of how your colours will turn out. Fluorescent colours and bright colours may appear more dull, due to the fact that colours that are available on our computers are different to the colours available for printing.
Tip 5:
Are your colours too similar? ie too many dark or light colours? When your design is printed the colours may not be clearly distinguished from one another and may blend together. Having some contrast and differences in colour will help your designs to stand out clearly.  What kinds of things can you design?
- Your business logo or name
- an art work that you have created
- donuts!!!
- the possibilities are endless!
Will you be designing your own custom washi tape? If you have a vision, but don't have the skills to achieve your outcome, why not get in touch with a local designer to help you out? There are also many video tutorials on Youtube that can help you learn some of the Adobe Photoshop and Adobe Illustrator tips that we have mentioned.
If you're ready to get started, pop over to our custom tape info page to find price lists and all the important things you need to know to get your custom tape project happening.
Continue Reading
-
 If you’re searching for the perfect Christmas gifts for stationery lovers, look no further. Find the perfect stationery gifts this Christmas. Shop journals, diaries, pens, stickers, Japanese stationery and creative supplies for every stationery lover at WashiGang.Read now
 -

How to Use Your Stickers More!
Read nowIf you’ve been saving your stickers for “the perfect moment,” here are some fun and low-pressure ways to start using them up and enjoying them in your journal or everyday life.
-

Self-Care with Letter Writing
Read nowThere’s something oddly comforting about sitting down with a warm cuppa, your favourite pen, and a blank sheet of beautiful paper. It’s quiet. Slow. Intentional. In a world that’s always rushing and buzzing, letter writing offers a pocket of peace—a soft little pause that says, “You can breathe here.”
It’s not just nostalgic—it’s a form of self-care. Here’s why letter writing (with cute stationery, of course) might just be the most underrated way to chill out and reconnect with yourself and others.


![[TRENDING] Uni-Ball Gel Pens](http://www.washigang.com/cdn/shop/files/Screenshot_2025-11-11_at_3.38.08_pm_300x300.png?v=1762839527)
![[NEW] Mildliner 2025 'Calm' Colours](http://www.washigang.com/cdn/shop/files/Zebra_Calm_300x300.jpg?v=1750726556)


Comments
Leave a comment